Once we have created the characters of the story (in Scratch we call them “sprites”), we can make them move around the stage. Scratch allows us to move the sprites in all directions, we can also make them turn, glide, etc.
Move and Turn
The two most basic movement instructions are “move” and “turn”. They are in the movement menu (blue menu).
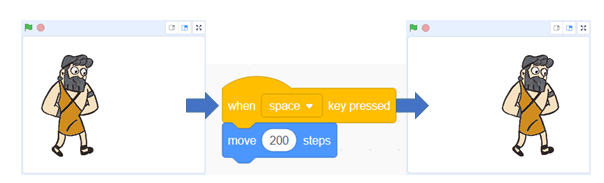
The instruction “move X steps” makes the character move x steps in the direction the sprite is pointing to. The “steps” are the unit of measure for distance in Scratch. Instead of talking about millimetres or pixels, in Scratch we talk about “steps”.
The type of movement this instruction causes is instantaneous. The sprite disappears from the point where it is and reappears X steps ahead. Therefore, this instruction does not make the character glide, but it is a quick move.
In the following example, we see the effect of moving Ulysses 200 steps forward.
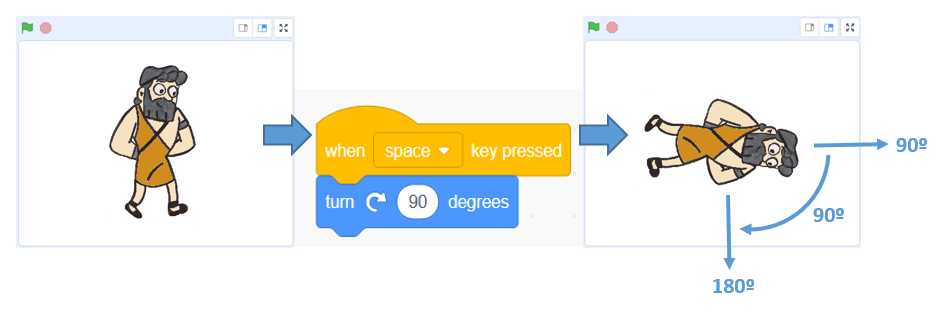
We use the instruction “turn X degrees” to turn our sprite. There are two ways to do this. There is a “turn right” instruction (clockwise) and a turn left instruction (counterclockwise). The value we give to X should be a number between 0 and 360.
There is also an instruction “point in direction X”, which allows us to make our sprite point to a certain direction. Do not confuse these instructions: “turn” makes the character turn the degrees we want, while “point” makes the character point to a direction we have decided.
In the following example, Ulysses is facing right (that is, pointing at 90º). If we turn him 90º clockwise, he will be looking down (that is, pointing at 180º).
Coordinate system
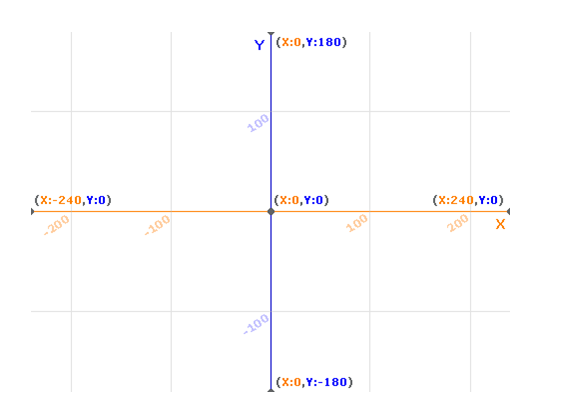
Scratch’s coordinate system uses 2 coordinates, “X position” and “Y position”, to determine the location of a sprite on the stage. The “X position” value determines the horizontal location of the sprite and the “Y position” value determines the vertical location or height. The stage is a 480×360 rectangle, such that: the X position can range from 240 to -240, where 240 is the rightmost a sprite can be and -240 is the leftmost, and the Y position can range from 180 to -180, where 180 is the highest it can be and -180 is the lowest it can be.
Coordinates are, by convention, written as a pair (X, Y): for example, the centre of the screen is (0, 0).
In the image below we can see this coordinate system.
To place the character in a certain (X, Y) position, there are basically two instructions:
– Go to (X, Y): this places the character in the (X, Y) position that we decide. The movement is immediate.
– Glide T seconds to (X, Y): this causes the character to slide from its current point to the (X, Y) destination point. The movement takes the seconds we indicate in T.
The “glide” instruction is very useful when creating animated stories, because it allows us to move the characters with smooth and precise movements, and to control the speed.
Show and hide
The “Show” block is in the Looks menu (purple menu). If the sprite is hidden, it will show the sprite — if the sprite is already showing, nothing will change. This block is one of the simplest and most commonly used Looks blocks.
The “Hide” block does the opposite. If the sprite is shown, it will hide the sprite — if the sprite is already hidden, nothing happens.
These two instructions are very useful for creating stories. In some scenes we need some characters but some we do not. With “Show” and “Hide” we can make them appear and disappear whenever we want.
Changing the size of characters
Size is a value given to all sprites. The default is 100 % (the sprite at its normal size) but can be changed with the size blocks.
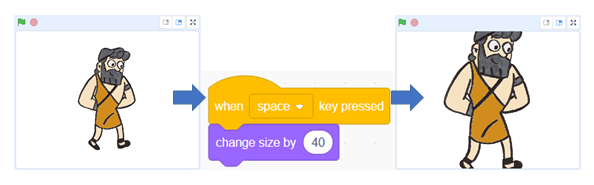
The “Change Size by X” block is a Looks block. The block changes its sprite’s size by the specified amount. The default sprite size is 100; size values below that percentage are for shrunken sprites, and size values above it are for overlarge sprites.
There is also a “Set Size to X” block. It sets its sprite’s size to the specified amount.
In the following example, Ulysses has a size of 80, and using the instruction “Change size” we increase its size by 40 points, making the size of the sprite 120.
Specifying the character’s characteristics
We have explained how to move the sprite, make it appear and disappear, and resize it. All this by means of instructions (blocks) that we use inside our program when we create the animated story.
We can also specify the size, position, direction and whether it is visible or not, using the panel under the stage. This is usually used to initialize the sprite’s parameters once created. But then, in order to change its characteristics during the story, we have to do it as we had explained it, through the programming blocks.