I – Towards the management of diversity in the classroom
I.1 – This handbook
I.2 – The DIVERSE project
I.3 – The current challenges
I.4 – Opening up the classroom
II – Drama in Education
II.1 – Introduction to the theory
II.2 – Description of the method
II.3 – Three lesson plans
II.4 – Some more tools
II.5 – Resources
III – Digital storytelling
III.1 – Introduction to theory
III.2 – Description of the method
III.2.1 – Aims of the method
III.2.2 – Application across the curriculum
III.2.3 – Resources and technology requirements
III.2.4 – Creating characters (sprites) and backgrounds (backdrops)
III.2.5 – Moving the characters
III.2.6 – Creating a dialogue between two characters
III.2.7 – Creating a story (a sequence of scenes)
III.2.8 – Possible issues
III.2.9 – Making the story collaborative
III.2.10 – Organization. Different collaborative options
III.3 – Three lesson plans
III.4 – Some more tools
III.5 – Resources
IV – Folktales
IV.1 – Introduction to theory
IV.2 – Description of the method
IV.3 – Two lesson plans
IV.4 – Some more tools
IV.5 – Resources
V – References
III.2.8 - Possible issues
There are some very common issues, which arise frequently when we are learning how to create stories with Scratch. In this section, we answer some of the most repeated ones.
Rotation style
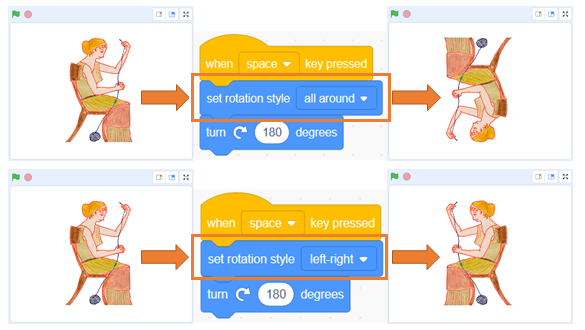
Often, we need our character to turn and look the other way. If we use the “turn” instruction it can happen that the sprite is upside down, and that’s not the effect we wanted.
We can change the way we turn by using a block called “Set Rotation Style” (movement menu).
In the next example we’ll see the difference between turning using the left-right style and the all-around style.

Where is the sprite?
Sometimes we run our story, and everything goes smoothly, but when we start it up again, the characters don’t show up. This is because when the story ends, we have left them hidden (with “Hide” block), and therefore when the story begins we have to remember to show them (with “show” block).
In fact, this commentary is useful to start the story and to start each scene. We always have to place our characters in their initial positions and then show them.
Layers
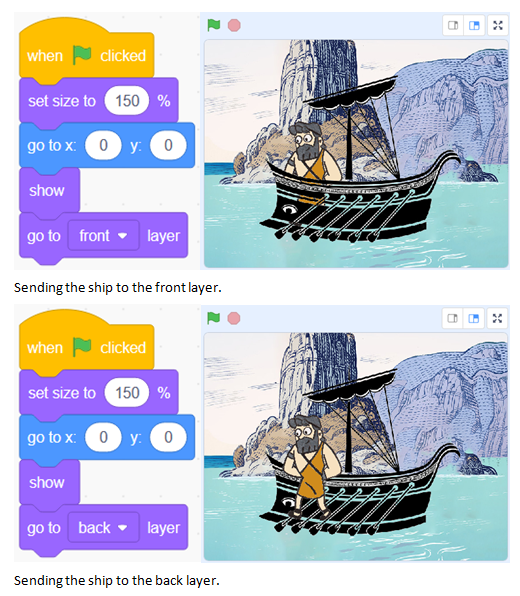
In Scratch, sprites are organized in layers. So, when they cross, there’s always one that’s in front of the other.
Sometimes in the stories we need to get one character in front of another. To do this we use the “Go to (back/front) layer” instruction.
In the following example we see the difference between having the ship in the front layer or in the back layer. We are interested in having it in the front, since that way the effect is that Ulysses is inside.

